Installing the QSS Encryption Module Using the Sobol PRNG HSS
Preparation
It is assumed that the work is being performed on a server running Astra Linux 1.7, the QHB DBMS is already installed, the cluster files are located in the /opt/qhb/ directory, and all actions are performed as the root user. Installation packages must also be obtained. The necessary packages are requested from the QHB provider and the RNG source (in this case, the Sobol HSS1).
Installing Packages
Install .deb packages:
sudo dpkg -i LIBGOSTCRYPTO_1_0_0_1_AMD64.DEB
sudo dpkg -i QSS_1_0_0_1_AMD64.DEB
sudo dpkg -i sobol_4.4-17-astra1.7-signed_amd64.deb
sudo dpkg -i sobol-scheck_4.4-17-astra1.7-signed_amd64.deb
To install libglade2-0, you need to:
- Insert the disk with the base repository and add it to etc/apt/sources.list.
- Run the command:
apt install libglade2-0
Setting up QSS
Add OS users administering QSS to the qss-admin group using the following command:
usermod -a -G qss-admin <username>
Add OS users who will perform client actions with QSS to the qss-client group. The user qhb must be added using the following command:
usermod -a -G qss-client qhb
Additional users are added using the command:
usermod -a -G qss-client <username>
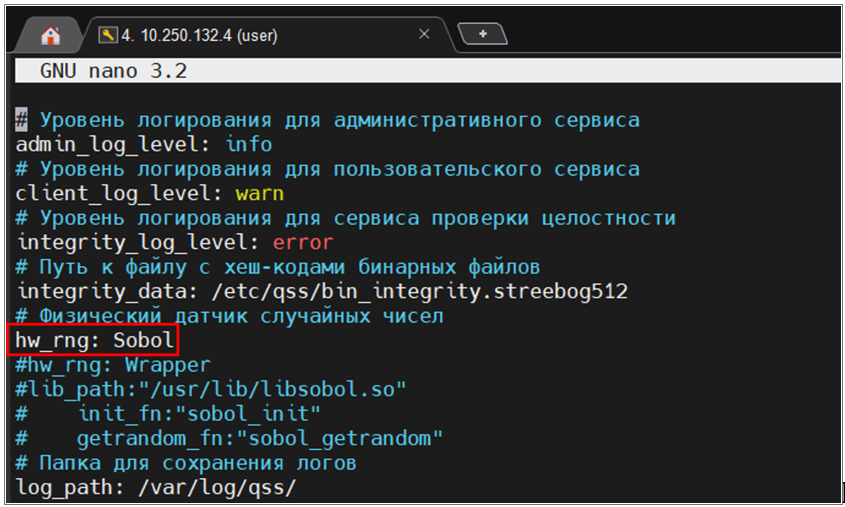
Edit the settings file /etc/qss/config.yml, change the hw_rng value from Os to Sobol (used PRNG2):
nano /etc/qss/config.yml
Figure 1. Changes Made to the /etc/qss/config.yml File
Evaluate the hash sum and append it to the end of the checksum file /etc/qss/bin_integrity.streebog512:
qss-client streebog512 --skip-bin-integrity /usr/lib/libsobol.so >> /etc/qss/bin_integrity.streebog512
Check that the hash sum is written correctly:
cat /etc/qss/bin_integrity.streebog512
Edit the service properties file /lib/systemd/system/qss.service (you can simply replace the contents):
[Unit]
Description=Quantum Secure Storage

[Install]
WantedBy=multi-user.target

[Service]
Type=simple
User=qss
Group=qss
ExecStart=/usr/bin/qss

RestrictAddressFamilies=AF_UNIX
PrivateUsers=no
LimitMEMLOCK=infinity
LimitNOFILE=65536

RuntimeDirectory=qss
StateDirectory=qss
LogsDirectory=qss
ConfigurationDirectory=qss
RuntimeDirectoryMode=755
StateDirectory=750
LogsDirectoryMode=750
ConfigurationDirectoryMode=755
UMask=0077

CapabilityBoundingSet=~CAP_AUDIT_CONTROL CAP_AUDIT_READ CAP_AUDIT_WRITE
CapabilityBoundingSet=~CAP_DAC_OVERRIDE CAP_DAC_READ_SEARCH
CapabilityBoundingSet=~CAP_MAC_ADMIN CAP_MAC_OVERRIDE
CapabilityBoundingSet=~CAP_NET_ADMIN CAP_NET_BIND_SERVICE CAP_NET_BROADCAST CAP_NET_RAW
CapabilityBoundingSet=~CAP_SETGID CAP_SETFCAP CAP_SETPCAP CAP_SETUID
CapabilityBoundingSet=~CAP_SYS_ADMIN CAP_SYS_BOOT CAP_SYS_CHROOT CAP_SYS_NICE CAP_SYS_HSSCT CAP_SYS_PTRACE CAP_SYS_RESOURCE CAP_SYS_TIME CAP_SYS_TTY_CONFIG
CapabilityBoundingSet=~CAP_IPC_LOCK CAP_BLOCK_SUSPEND CAP_CHOWN CAP_FOWNER CAP_FSETID CAP_IPC_OWNER CAP_KILL CAP_LEASE CAP_LINUX_IMMUTABLE CAP_WAKE_ALARM
Update service configuration:
systemctl daemon-reload
Run QSS as SystemD service:
systemctl start qss.service
Check the service operation:
systemctl status qss.service
There shouldn't be any errors; the "Active" string should show "active (running)." Enable the service to autorun at system boot:
systemctl enable.service
If an error occurs after launching and the service fails to run, you need to elevate the qss user privileges:
pdpl-user -l 63:63 qss
Initializing the QSS Storage
Initialize the QSS storage as a user in the qss-admin group:
qss-admin --init <username>
<user_password>
<user_password>
Figure 2. Initializing the QSS Storage from the User "user"

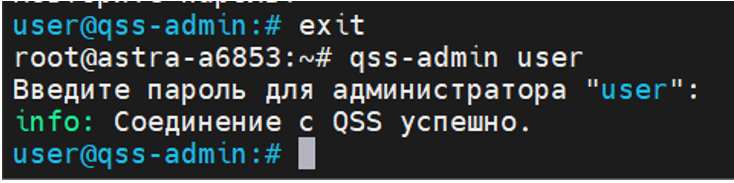
Exit the management interface using the 'exit' command or the Ctrl+C or Ctrl+D key combination. Check authorization in the management interface:
qss-admin <username>
<user_password>
Figure 3. Checking Authorization in the Management Interface
Create working keys in the management interface using the command (key types can be found using the built-in help or auto-completion by pressing Tab):
key create <key_type (select argument using <Tab> key)> <key_label>
Example: key create kuznyechik key.
Figure 4. Creating a Working Key

Figure 5. Checking the Status with the "key list" Command

Unlock working keys in the management interface using the command:
key unlock <key_label> (key unlock key)
Figure 6. Unlocking Working Keys with the “key unlock key” Command

Check the status of working keys in the management interface using the command:
key list
Figure 7. Checking the Status with the "key list" Command After Unlocking

Exit the management interface using the exit command or the keyboard shortcut
Ctrl+C or Ctrl+D. Add keys to the qss configuration for qhb: in
the /opt/qhb/qss2_config.toml file, set the value for the parameter
key — previously created and unlocked keys key = <key_label> (in the
example, key).
Figure 8. Adding a Key to the "qss" Configuration for "qhb"

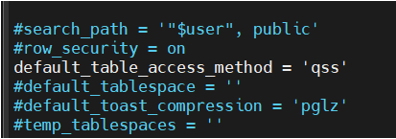
Set default access to tables with encryption in the qhb.conf file: set default_table_access_method = 'qss' and qss_mode = 2. After this, execute the command:
systemctl restart qhb-test»
Figure 9. Editing the "qhb.conf" File

Figure 10. Installing and Configuring Automatic Encryption

Checking the Functionality of the QSS Encryption Module
After installing the QSS encryption module, which uses Sobol PRNG HSS, you need to check its functionality. To do this, run a short test. You need to log in as qhb.
Figure 11. Authorization as User "qhb"

Before starting testing, you must check the values in the port and
default_table_access_method menu fields. The value in the port field
is required for connection to the shell in which the SQL commands will be executed.
The Default_table_access_method parameter specifies the default table
access method that is used when creating tables or materialized views if one is
not explicitly specified in the CREATE command, or when executing the SELECT ... INTO command, which does not allow an explicit access method to be specified.
The default value is heap (unencrypted data).
Open the qhb.conf configuration file in a text editor with the command
nano /opt/qhb/qhb.conf (since this file only needs to be opened for verification;
vim or cat can be used instead of nano).
Find the field with the value port and remember it.
Figure 12. Clarifying the Value in the "port" Field

Next, find the default_table_access_method field. In the example, the value is qss. This was changed when configuring the QSS encryption module. This means that, by default, records in newly created tables will be encrypted using the QSS encryption module. This field may also contain the value heap. This means that values in new tables will not be encrypted.
Figure 13. Clarifying the Value in the "default_table_access_method" Field
After checking, continue testing the QSS module. Connect to the shell to
execute SQL commands. To do this, type the command psql -h localhost -p 50000,
where:
- -h — specifies the host on which the QHB server is running (by default, localhost is used if the server is on a single machine);
- -p — specifies the port number appeared in qhb.conf (in this case, this is not the default port (5432), but the port changed when configuring QHB).
Figure 14. Connecting to the DBMS

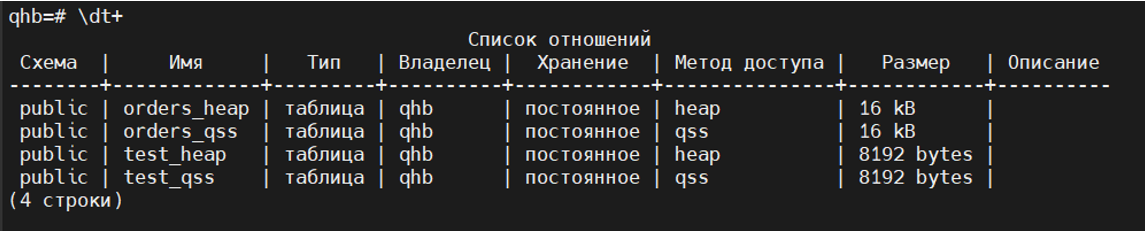
The \dt+ command displays a list of tables with their contents. This example
shows previously created tables (more will be created later).
Figure 15. Displaying a List of Database Tables

Create two tables. One will contain encrypted data, the other will contain unencrypted data. To create an encrypted table, use the following command:
create table test_qss (id int4, test text) using qss;
using qss isn't necessary in the command, as the mode is already set to encrypt the data in the tables.
To create a table without encryption, use the following command:
create table test_heap (id int4, test text) using heap;
You need to specify the using heap parameter, so that the table should not be encrypted.
Figure 16. Creating Two Database Tables

Use the \dt+ command to check the created tables. The Access Method column
shows that one table is encrypted, while the other is not.
Figure 17. Displaying a List of Database Tables After Adding
Execute commands:
SELECT pg_relation_filepath('test_qss');

SELECT pg_relation_filepath('test_heap');
They show the file path to a table, index, sequence, or other entity stored in a separate file (the required fields are base/5/16398 and base/5/16403).
Figure 18. Output of the File Path to the Database Table and Its Index

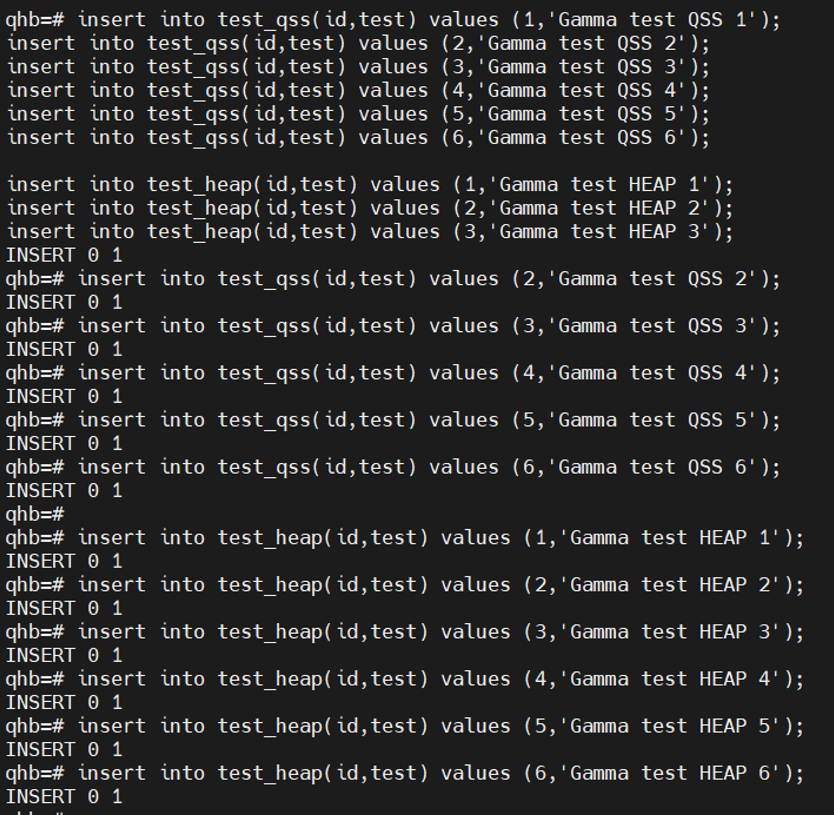
Add new records to the database table using the commands:
insert into test_qss(id,test) values (1…,'Gamma test QSS 1…');
insert into test_heap(id,test) values (1…,'Gamma test HEAP 1…');
Figure 19. Adding New Records to the Database Table
Execute the command:
checkpoint;
This command is required to force a checkpoint in the write-ahead log (WAL). This is necessary for:
- Ensuring data integrity — changes are written to disk, ensuring that the database can recover to a consistent state after a failure.
- Performance optimizations — regular checkpoints limit the amount of transaction log (WAL) that needs to be processed during recovery.
- Memory management — checkpoints flush dirty data pages from memory to disk, allowing QHB to free memory for new transactions.
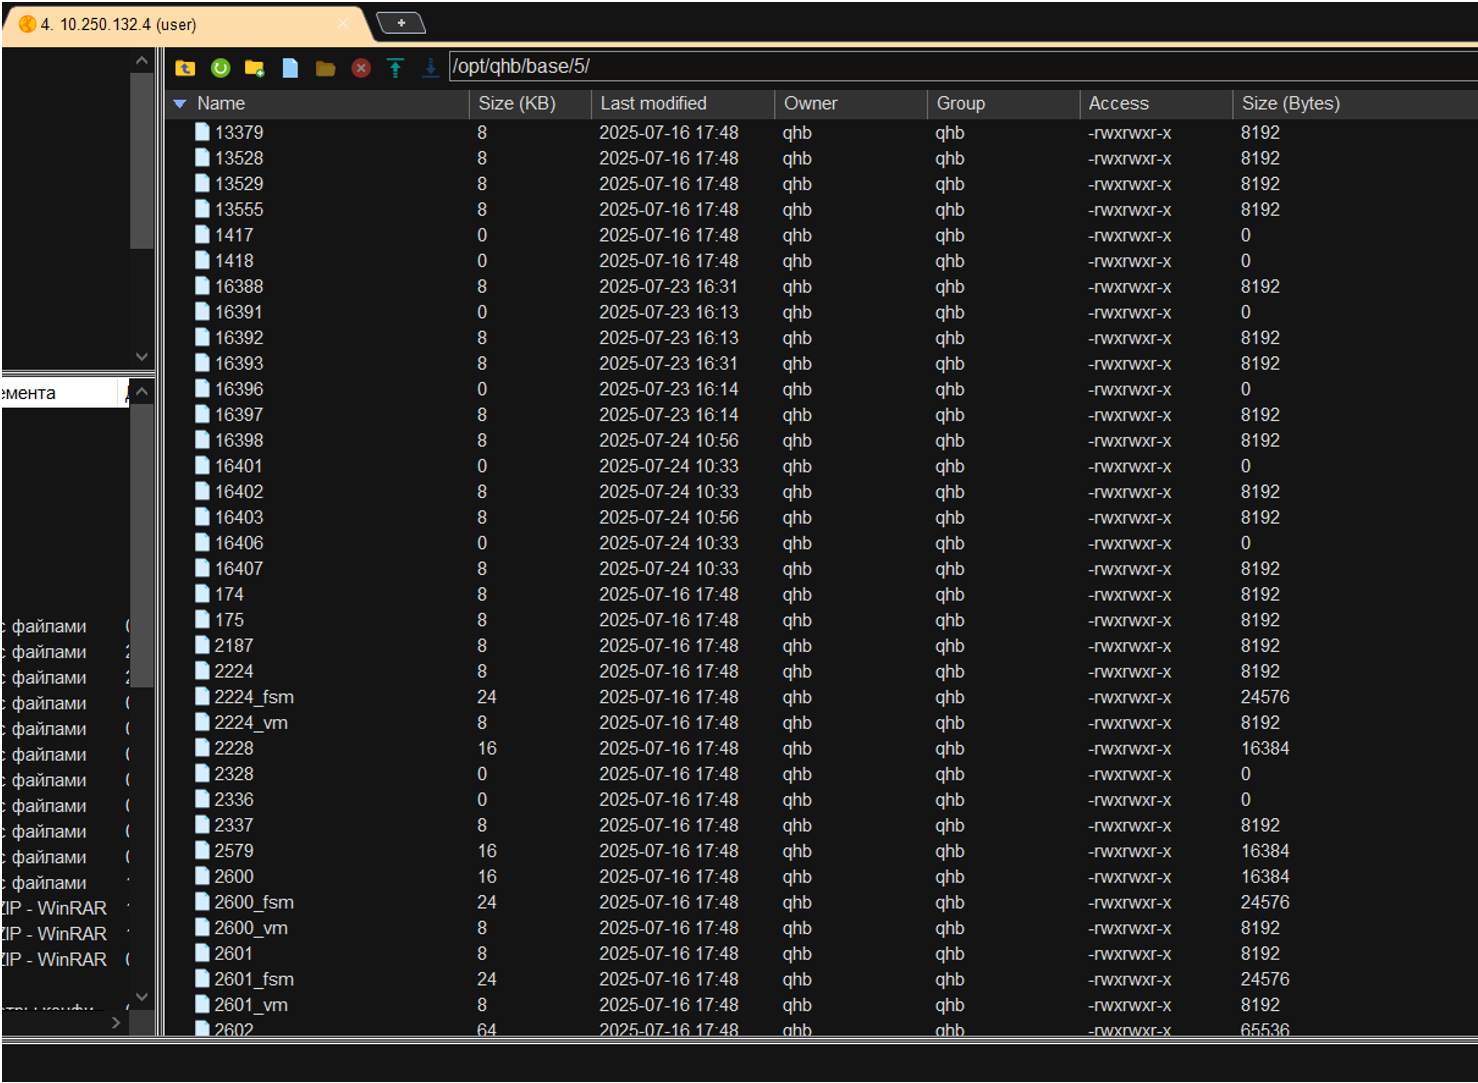
After preparation, you need to check whether the data is encrypted. To do this, you need to connect to the database via SFTP. Since a standard user doesn't have permissions for the /opt/qhb/ directory and all objects within it, you need to elevate the permissions using the command
chmod -R 775 /opt/qhb/
Next, you need to go to the /opt/qhb/base/5/ directory and find the previously created tables 16398 and 16403.
Figure 20. Viewing Previously Created Tables
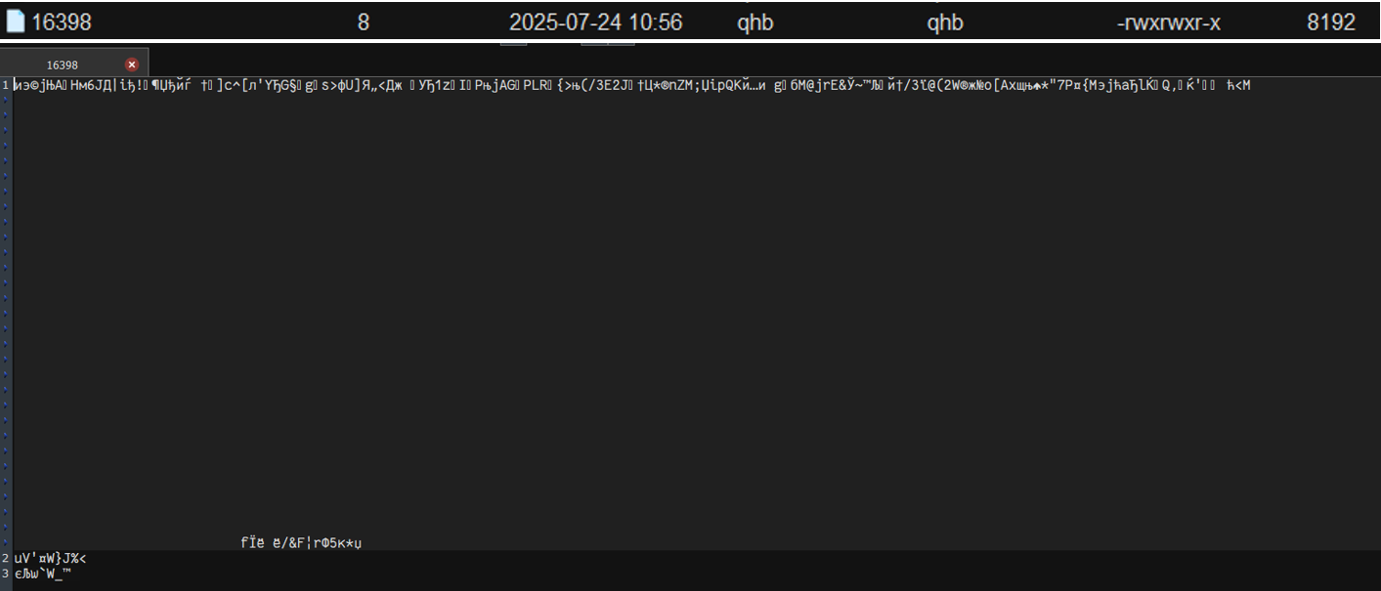
When viewing table 16398, it is clear that the data written in it is encrypted.
Figure 21. Checking the Encryption of DB Table 16398
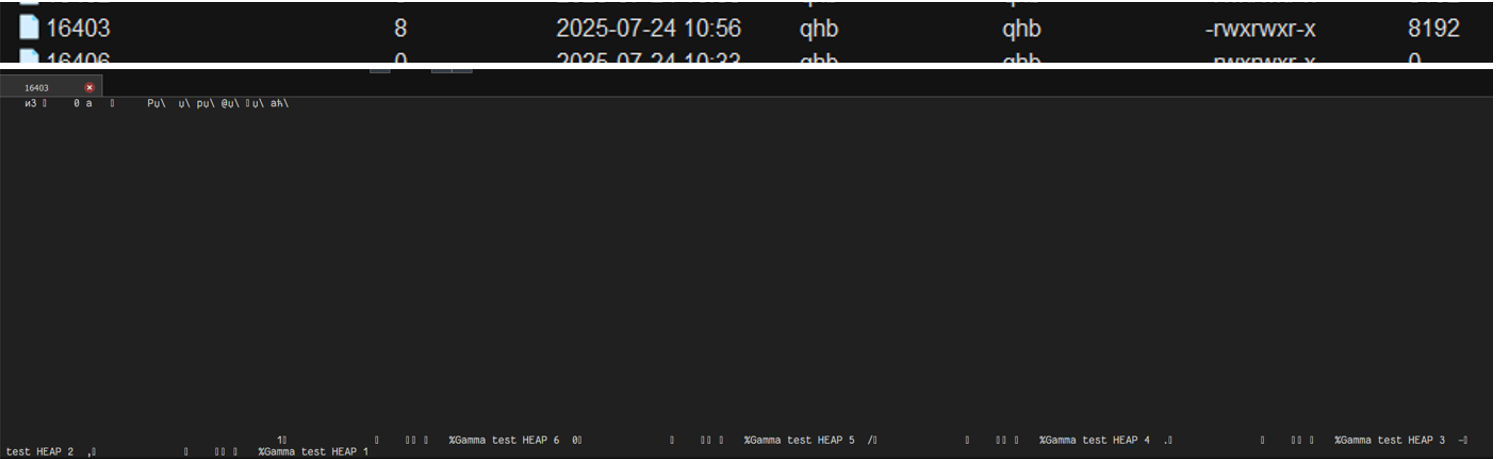
In table 16403 it is clear that the data written in it is not encrypted.
Note
It's crucial to consider the language in which the data in your database tables is stored. Cyrillic isn't always correctly interpreted by editors or programs, even if they were originally designed for it.
Figure 22. Checking the Encryption of DB Table 16403
Sobol HSS — (hardware and software system) is a certified solution for protecting critical information, ensuring trusted booting of the operating system, system integrity monitoring, and user authentication using electronic keys.
PRNG — physical random number generator.